5.Installation
of ODI (11.1.1.7.0)
Step
1:
Download the required ODI software from the meta
link/OTN /e delivery from oracle websites
[first you
need to sign in before you downloading
the software]
Then
Unzip/un tar the software to the respective location
it will create directory with the name” ODI” and give the permissions to the
user who can access the software.
Step2:
Now logged in as a user go to the directory “ODI”
where you have un zipped the software. Now go to the ODI directory under which
you can see “Disk1” now go into the “Disk1” directory you can see the disk1/2/
.Now go inside the “disk1” directory and
run” runInstaller”
As
$./runInstaller in
linux.
After checking prerequisites like java, space etc…
It will ask for JDK path.
In my system jdk is located in /usr/bin/java-1.7.0.
If this path is wrong you will not get wizard
screen.
It will open a wizard window like the following. as an welcome screen

The first wizard screen is a welcome screen. Click
on next button.
Step3:
Now the following screen appear .

Check Skip software updates button and click on next
button.
Click on next button
Step4:
Now the following screen appears
Note: Don’t select
standalone installation.

Check the check box all in Developer installation
and in Java EE Installation.
Click
on next button.
Step5:
Now the following screen appears.
After prerequisite checks passed click on next
button. Otherwise resolve the dependencies/errors.
Step6:
Now the following screen appears.
By default it will take oracle base directory
followed by null under oracle_ODI_1 directory will chose. If want to change the
path, you can change the path by using browse button. Once the oracle home
directory is fixed click on next button.
Step7:
Now the following screen appears. 
Check
the radio button of weblogic server and click on next button.
Step8:

Check
the radio button of skip Repository Configuration and click on next button.
Step9:
The following screen will appear

In
installation summary click on save button to save Response file.
Then click on install button.
Step10:
Installation will start from 0 and progress to 100%
Once it reached 100% ODI configuration will start.
Step11:

Once Odi configuration progress reaches 100% click
on next.
Step12:

Click on finish .That’s end the ODI installation.
6.RCU
for OBIA 11.1.1.9.1
Download the RCU software from the meta link/OTN /e
delivery from oracle websites
[First you
need to sign in before you downloading the
software] (http://www.oracle.com/technetwork/middleware/downloads/fmw-11-download-092893.html)
Then
Unzip/un tar the software to the respective location
it will create directory with the name” rcu” and give the permissions to the
user who can access the software .
Step1:
Go to “rcu” directory ---àthen go to” rcuhome” directory-àthen go to” bin” directory and run “rcu
file”
As ./rcu(if it is unix/linux) if it is windows run “rcu.bat”
Step2:
It will open a wizard screen like the following
screen.

Step3:

In this screen select database type as “oracle
database” and give following credentials
Hostname as “oracleobiee.com
Port as”1521”
Service name as”obia”
Username as “sys”
Password as “manager”
Role as “sysdba”
Click on next button.
Step4:

In this screen select create a new prefix as DEV
Select all the components.
Click on next button.
Step5:
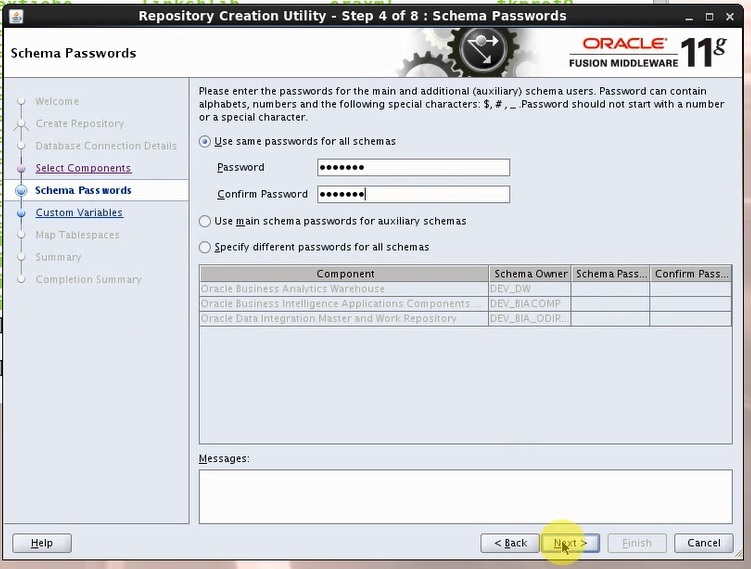
Provide password for all the schemas as “Admin123”
confirm password as “Admin123”.
The following are the schemas are 1.DEV_DW
2.DEV_BIACOMP
3.DEV_BIA_ODIREPO
Then click on next button.
Step6:
The following screen will appear.
Note:
The
value is located in the following screen contains path.


The above screen showing copying & pasting path
in the respective value field
Then click on next button.
Step7:
In the above screen click on Manage table spaces
button then following screen will open.

In the above screen select the filename click on
edit button next to green plus symbol change as follows.

Change on size as 20GB
And maximum size as “unlimited”
Then click on ok button.
Then change the following DEV_DW_IDX as follows

Click on edit button.

Change size as 5GB
And maximum size as “unlimited”
Click on ok button.
Then change the following DEV_DW_STG as follows

Click
on edit button

Then change the following DEV_DW_TMP as follows

Click the edit button.

Change size as 15GB and maximum size as “unlimited”
Click on ok button. Then click on close button.
Step8:
The following screen will appear.

Click on next button.
Click on ok to create table spaces


Click on ok button.
Then click on next button.
Step9:
The following screen will appear to you

Then click on create button.
Step10:

Step11:
In the following screen you will success message.

Click on close button,that end’s the installation of
RCU for OIBA 11.1.1.9.1 version.
No comments:
Post a Comment