9.ATGlite
& FSM upgradation
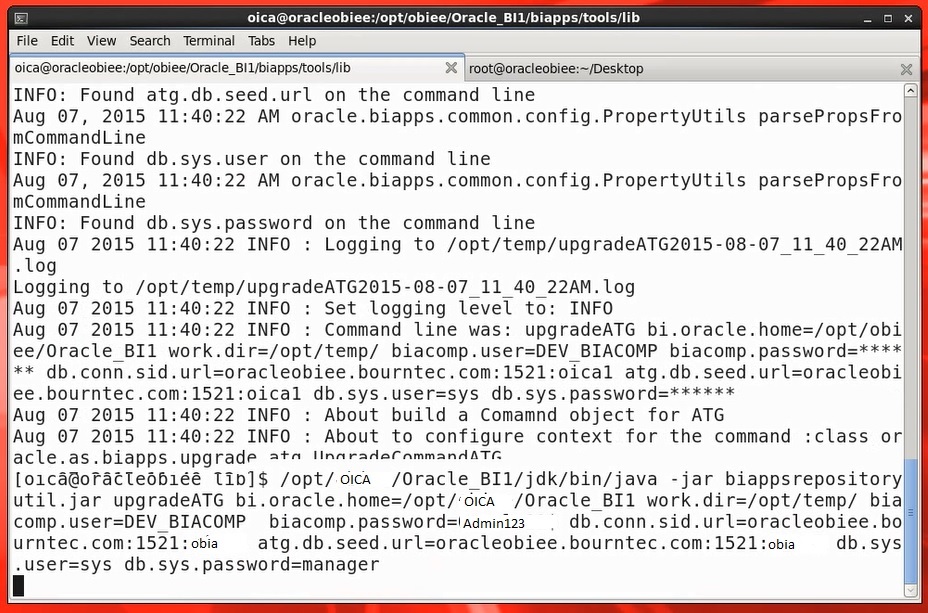
To upgrade ATGlite & FSM.,we need to go to directory called lib which is located in the following path.
“/opt/oica/oracle_BI1/biapps/tools/lib”
Under lib directory there is a file called
biappsrepositroryutil.jar file we have to run this file with java followed by
giving some credentials like database, hostname, port no, SID etc.
Create a work directory in some location say
“/opt/temp” now temp directory acts as workdir.
ATGlite
Run the following script in the location
“/opt/oica/oracle_BI1/biapps/tools/lib”
Similarly replace ATG in place with FSM , and atg
with fsm. Re run the respective script for FSM.
That will upgrade ATG lite & FSM automatically.
FSM
Run the following script in the location
“/opt/oica/oracle_BI1/biapps/tools/lib”
$/opt/oica/Oracle_BI1/jdk/bin/java -jar
/opt/oica/Oracle_BI1/biapps/tools/lib/biappsrepositoryutil.jar upgradeFSM
bi.oracle.home=/opt/oica/Oracle_BI1 work.dir=/opt/temp/ biacomp.user=DEV_BIACOMP biacomp.password=Admin123
db.conn.sid.url=oracleobiee.bourntec.com:1521:obia
fsm.db.seed.url=oracleobiee.bourntec.com:1521:obia db.sys.user=sys
db.sys.password=manager.
10.OBIA
Configuration
Note:
For OBIA configuration weblogic,DB &
OBIEE,ODI components must be up and running.
To configure obia go to “/opt/oica/Oracl_BI1/bin”
under this configApps.sh file.
We have to run conigApps.sh file to configure OBIA.
Note:
There
will be file called conig.sh and configApps.sh don’t be confuse between these 2
files.
$./configApps.sh
Then wizard opens
Step1:

Step2:
The following screen will appear to you

This is a prerequisite checks screen. Once all the
prerequisite checks completed click on next button. Otherwise trouble shoots
the errors until prerequisite check passes.
Step3:
The following screen will see you
Then click on next button.
Step4:
The following screen will see you.
By default all the specify installation location
will come, if not provide it as per obiee installation.
Then click on next button.
Step5:
The following screen will appear to you.

Select necessary components from the list.
By default we have to select BI Application
components.
If you need select Essabase for oracle Financial
Analytics otherwise don’t select.
Then click on next button.
Step6:
The following screen will appear to you.
Provide RPD password and confirm RPD password.
Make a note of RPD password.
Click on next button.
Step7:
The following screen will appear to you.

Provide details for BI Application Administrator
Username as “obiapps”
Password and confirm password as “Admin123”
Note:
Make
a note of username and password
Click on next button.
Step8:
The following screen will appear to you.

Provide connect string as hostname:portno:sid
MDS schema useraname as DEV_MDS
MDS schema password as “Admin123”
Click on next button.
Step9:
The following screen will appear to you.
Similarly provide respective details for BI
Application Components (DEV_BIACOMP) , Business Analytics warehouse(DEV_DW), BIApplications
ODI Repository(DEV_BIA_ODIREPO)

Provide connect string as hostname:portno:sid
i.e.”oracleobiee.com:1521:obia”
BIA Components Repository schema schema useraname as
DEV_BIACOMP
BIA Components Repository schema schema password as
“Admin123”
Click on next button.
Step10:
The following screen will appear to you.

Provide connect string as hostname:portno:sid
i.e.”oracleobiee.com:1521:obia”
Business Analytics warehouse schema username as
DEV_DW
Business Analytics warehouse schema password as
“Admin123”
Click on next button.
Step11:
The following screen will appear to you.

Provide connect string as hostname:portno:sid
i.e.”oracleobiee.com:1521:obia”
ODI Repository schema username as DEV_BIA_ODIREPO
ODI Repository schema password as “Admin123”
Click on next button.
Step12:
The following screen will appear to you.
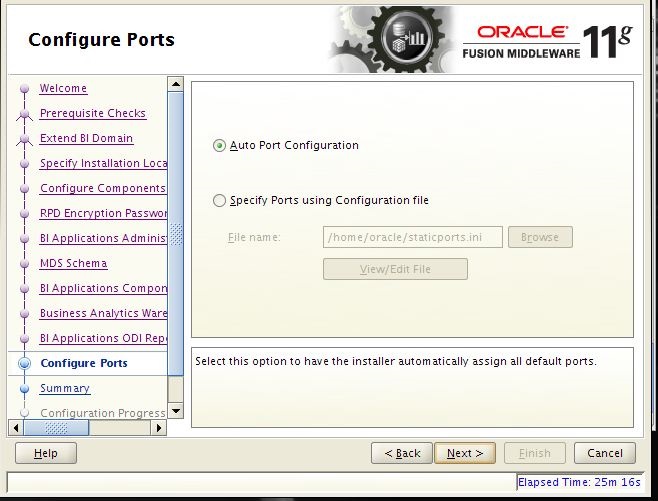
Step13:
The following screen will appear to you.

Then click on install button

Step14:
Once it progress reaches 100% configuration process
will start and reaches 100%

Then click on next button
Step15:
.

Type: Configure
Only - Extend BI Domain
Installation Details
Middleware Home: /opt/oica
BI Oracle Home: /opt/oica/Oracle_BI1
WebLogic Server Home:
/opt/oica/wlserver_10.3
BI Domain Home:
/opt/oica/user_projects/domains/bifoundation_domain
BI Domain Name: bifoundation_domain
Instance Home:
/opt/oica/instances/instance1
Instance Name: instance1
Configure Components
Configuration Manager
http://oracleobiee.com:9500/biacm
Functional Setup Manager
http://oracleobiee.com:9500/setup/faces/TaskListManagerTop
Oracle Data Integrator
http://oracleobiee.com:9509/odiconsole
That's End the installation & Configuration of OBIA 11.1.1.9.1
GOOD LUCK for any queries you can reach me @ kumar.mapping@gmail.com
No comments:
Post a Comment