OBIA 11.1.1.9.1 Part-2(RCU,OBIEE)
Part2
2.Running
RCU utility
Step1:
Download the RCU software from the meta link/OTN /e
delivery from oracle websites
[First you
need to sign in before you downloading the software] (http://www.oracle.com/technetwork/middleware/downloads/fmw-11-download-092893.html)
then
Unzip/un tar the software to the respective location
it will create directory with the name” rcu” and give the permissions to the
user who can access the software.
Step2:
Go to “rcu” directory --- then go to” rcuhome” directory- then go to” bin” directory and run “rcu
file”
As. /rcu(if it is unix/linux) if it is windows run “rcu.bat”
Step3:
It will open a wizard screen like the following
screen

Then click on next button.
Step4:
Then you will see following screen

Then
select create and click on next button
Step5:


 Give the details
Database type as “oracle database”
Host name: provide your “host name”
open Linux terminal type $”hostname”àyou will get result as” host name”.copy
the” host name “and paste here in the box.
Give port as “1521” because our database is running
on port no 1521
Service name as”obia” because our database
SID/service name is obia.
To find out sid open sql promt type as “select name
from v$database;”
Provide username as “sys”
Password as “manager”
And role as “sysdba”
Then click on next button.
Give the details
Database type as “oracle database”
Host name: provide your “host name”
open Linux terminal type $”hostname”àyou will get result as” host name”.copy
the” host name “and paste here in the box.
Give port as “1521” because our database is running
on port no 1521
Service name as”obia” because our database
SID/service name is obia.
To find out sid open sql promt type as “select name
from v$database;”
Provide username as “sys”
Password as “manager”
And role as “sysdba”
Then click on next button.
Step6:
 I want to create new prefix .i have selected as
create new prefix as DEV.
Then select the required services you want. Here I
have selected Metadata Services, Oracle business Intelligence services and
click on next button.
I want to create new prefix .i have selected as
create new prefix as DEV.
Then select the required services you want. Here I
have selected Metadata Services, Oracle business Intelligence services and
click on next button.


Step7:

Provide password for the for all schemas (please
make a note of this password)
Confirm password: again type the same password (in
our case Admin123)
And click on next button.
Step8:
Then the following screen will show to you.

Click on next button then click on ok button to
create tablespaces.
Step9:

Click on create button
Step10:
The following screen appears to you

Click on close button to close.
3.
OBIEE Installation(11.1.1.7.0)
Step
1:
Download the required OBIEE software from the meta
link/OTN /e delivery from oracle websites
[First you
need to sign in before you downloading the software]
Then
Unzip/un tar the software to the respective
location it will create directory with the name” OBIEE” and give the
permissions to the user who can access the software
Step2:
Now logged in as a user go to the directory “OBIEE”
where you have un zipped the software. Now go to the obiee directory under
which you can see “bishiphome” now go into the “bishiphome” directory you can
see the disk1/2/3/4/5 .Now go inside the “disk1” directory and run” runInstaller”
As$./runInstaller-àin
linux.
After checking prerequisites like java, space etc…
It will open a wizard window like the following.

This is a welcome screen click on next button.
Step3:
Now you will see the following screen

Select the radio button skip software updates and
click on next button.
Step4:
The following screen will appear to you

Select radio button either simple install/enterprise
install.
In this I have selected simple install and click on
next button.
Step5:
The following screen will appear to you.
In this step obiee installer will check all the
prerequisite check. If all the checks are passed you have to go next step by
click next otherwise solve the dependencies till all prerequisite checks pass
and click on next button.
Step6:
The following screen will appear to you.
By default in create New Bi system
Username will be “weblogic” otherwise provide
username as weblogic.
Provide and confirm password as “Admin123”
By default Domain Name as”bifoundation_domain”

Click on next button.
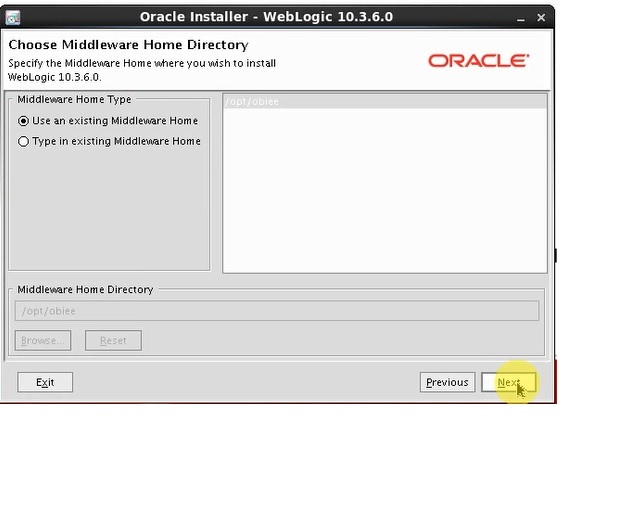
Step7:

Provide the oracle Middleware home location as
“/opt/oica” by using browse option.
Step8:

Select database type as oracle database
Connect string as hostname:portno:SID in our case it
is “oracleobiee.bourntec.com:1521:obia”
BIPATFORM schema username as “DEV_BIPLAFORM” and
BIPLATFORM schema password as”Admin123”
Click on next button.
Step9:
Similarly for MDS schema also

Then click on next button
Step10:

Select Auto port configuration
Then click on next button
Step11:

Uncheck the check checkbox I wish to receive
security updates via my oracle support.
Then click on next button.
Step12:
The following screen appears to you.
It contains installation summary. You can save
the file by click on save button at a specified location (replace oica in place
of obiee)
Then click on install button
Step13:

Installation will start and progresses from 0 to
100%.once it reached 100% configuration will started
Step14:
It will start from 0 to 100%.once it reached
100% installation and configuration will be successful
To complete following things maximum 60minutes will take depend upon harrware configuration.


Step15:
Then click on next button
Finally you will get URL’s .Save it using save
button

Then click on finish button that’s end the
installation of OBIEE